Free Automated Time Tracking

There are quite a few reasons for why you should be tracking the time you’ve spent on your projects, just read through one of the many websites that sell time tracking tools. If you are tech savvy, you might actually prefer having access to an easy to use and free API that allows you to do just that.

Usecase

At the end of this tutorial, you will be able to automatically keep track of how much time you’ve spent at your office (or wherever), without ever having to interact with a time tracking tool.

If you convince your team to also follow this tutorial, you could analyse who’s at the office during which time of the day and for how long, or quickly see who’s currently there.

The Tracking API

Luckily, there’s a free time tracking API on GitHub that you can use for automated time tracking. It’s a simple JSON API hosted on the Google App Engine, providing endpoints for our use case.

The API can handle 3 basic objects:

  • Users, representing the one who is using the API (e.g. you)
  • Topics, representing whatever you want to track (e.g. a project or location)
  • Actions, representing tracking events (e.g. starting or stopping to work)

Setup

First of all, you’ll need to create a user and a topic, so that your activities can be assigned to you and your project. Fire the following web requests to create a new user called “John Doe” and a new topic named “Work”:

http://placetracking.appspot.com/api/users/add/?name=John%20Doe
http://placetracking.appspot.com/api/topics/add/?name=Work

Each of these requests will return a JSON representation of the object you just created. Make sure that you save these, as you will need the ids of these objects for tracking. And that’s it, your good to go and may start tracking now!

Add actions

To actually track something, simply call the following endpoint:

http://placetracking.appspot.com/api/actions/add/?name=start&userId=123&topicId=456

This time, you’ll need to replace “123” and “456” with your user id and topic id (the ones you created during the setup). The request above would create an action named “start”, you would want to fire it each time you start working on your project. In order to let the API know that you stopped working on your project, simply fire:

http://placetracking.appspot.com/api/actions/add/?name=stop&userId=123&topicId=456

Keep in mind that you should always use the same two actions if you want to get any meaningful results later. Actions that make sense could be:

  • start and stop
  • pause and resume
  • arrive and leave

If you are working with a team, make sure that everyone uses the same topic id.

Automate using IFTTT

Of course you don’t want to manually call this API every time. You can automatically trigger actions using IFTTT, for example when you connect to your office WiFi network (see example recipes).

Let’s say you want to automatically add an action to the API whenever you arrive at your office location:

  1. Create a new recipe
  2. Create a trigger

    • Select the Android / iOS Location channel
    • Select the You enter an area trigger
    • Select your office location
  3. Create an action

    • Select the Maker channel
    • Select the Make a web request action
    • Enter the API request for adding an action as URL
    • Set the request Method to GET
  4. Name and save your recipe

Now every time you arrive at your office, IFTTT will automatically add an action to the tracking API. For this to make any sense, you also need to create a recipe that triggers when you leave your office.

If you want to add actions based on your WiFi network, use these pre-configured recipes: Start tracking and Stop tracking.

Analyse what you tracked

After you’ve created some actions, you might want to check what the API recorded for you:

http://placetracking.appspot.com/api/actions/get/?userId=123

You could use the returned data to draw some fancy charts on a website or simply calculate how much time you’ve spent on a project in the last month. If you want to filter the returned actions, you can add some of these parameters to the request:

  • topicId to filter the actions by topic (e.g. “456”)
  • name to filter the actions by name (e.g. “start”)
  • minimumTimestamp to get actions after (e.g. “1468413570000”)
  • maximumTimestamp to get actions before (e.g. “1468417170000”)
  • limit to limit the number of returned actions (e.g. “50”)
  • offset to skip some actions (e.g. “25”)

How to uninstall a Windows program

This guide will teach you how to uninstall software by using the Windows Control Panel.

Open the Control Panel

Press the Windows key and search for “Control Panel” or use the shortcut Win + C to open up the Windows Control Panel.

Navigate to:

Control Panel\Programs\Programs and Features

Uninstall a program

A list with your installed applications will appear. Search for the name of the program you want to remove, right-click on it and select Uninstall. Follow the given instructions from the program’s uninstaller. You may need to restart your PC to apply changes.

How to ping an IP address

This guide will teach you how to test the reachability of a host on an Internet Protocol using the ping command.

Open the Run dialog

Use the shortcut [Win] + [R] to bring up the run dialog. Enter “cmd” and press [Return] to start the command prompt console.

Use the command prompt

Let’s say you want to test the reachability of a host with the IP address “192.168.1.26”. Your command would look like:

ping 192.168.1.26

Press [Return] to execute the command and wait for the result. In the example below, the host is reachable.

If the host is not reachable, the result would be “Reply: Destination host unreachable”.

Open a port in the Windows Firewall

This guide will teach you how to open a single TCP or UDP port in the Windows Firewall.

Open the Control Panel

Press the Windows key and search for “Control Panel” or use the shortcut Win + C to open up the Windows Control Panel.

Navigate to:

Control Panel\System and Security\Windows Firewall

Make an exception

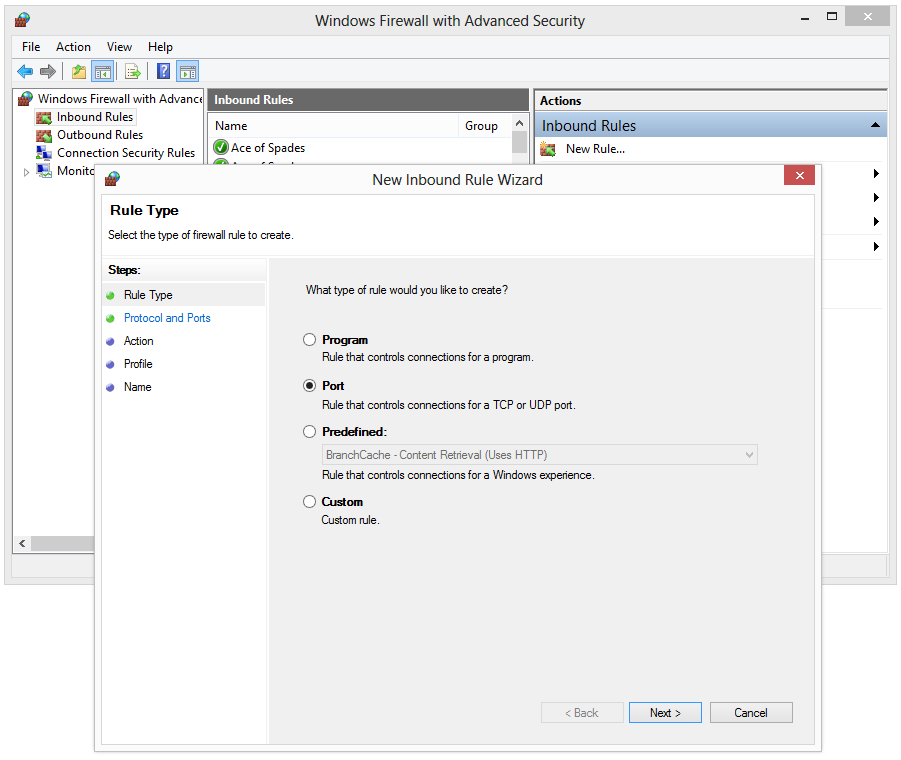
Click on “Advanced settings” and a new windows will appear. Click “Inbound rules” on the left and “New rule” on the right. Select “Port” and follow the given instructions to enter a new UDP or TCP port.

Allow a program in the Windows Firewall

This guide will teach you how to make an exception for a single program in the Windows Firewall.

Open the Control Panel

Press the Windows key and search for “Control Panel” or use the shortcut Win + C to open up the Windows Control Panel.

Navigate to:

Control Panel\System and Security\Windows Firewall

Make an exception

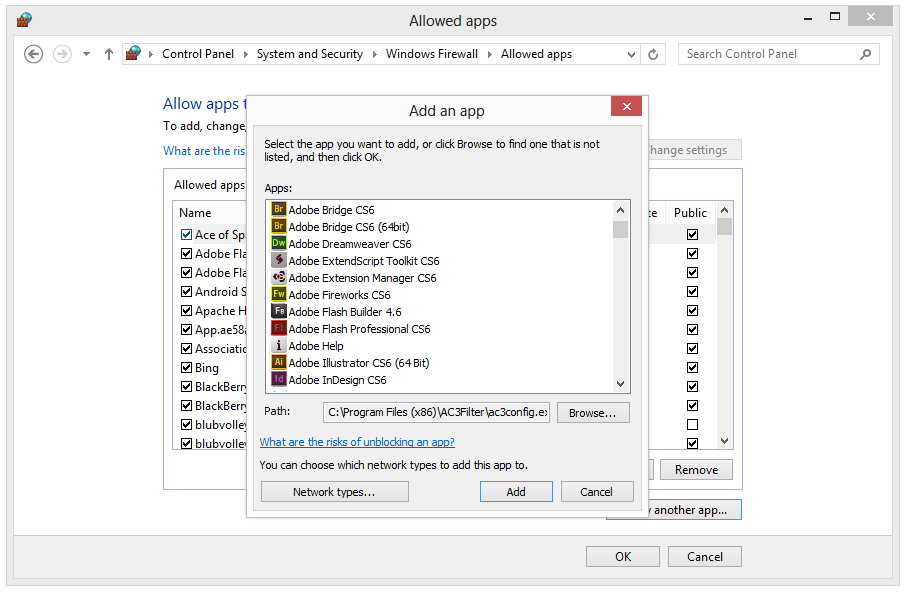
Click on “Allow a program or feature through Windows Firewall” and a list with your installed applications will appear. Click “Change settings” to allow your program in public or private networks. If your program is not listed there, click on “Allow another app” and browse for it.

How to get Android JellyBean on BB10

This guide will teach you step-by-step how to install the new Android JellyBean runtime on your BlackBerry 10 device. Please follow the instructions carefully. If you don’t feel familiar with the steps shown below, you should wait for an official update to BB10.2 instead.

Disclaimer

You will install an unofficial operating system on your device, it will reset all your data and settings. We are not responsible for any damage or data loss your device may take.

Backup your device

Because you will lose your data, it’s inevitable that you make a full backup of your device. Connect your device via usb to your pc and open BlackBerry Link. Switch to your device, click settings and create a new backup.

Once that’s done, make sure that you really want to switch to a developer version of BB10. You may not be able to restore your backup on the new OS, however you can still downgrade to your previous OS and restore your backup.

Get the developer OS

You can download the 10.2.0.1047 autoloader from here. It’s an about 1GB large windows executable. There’s no way to install the OS using a Mac.
(Source: CrackBerry Forums)

Install BB10.2

When you have the autoloader, connect your device via usb to your pc. Close BlackBerry Link and run the autoloader executable. A command window will popup and your device will restart itself. If your device is password protected, the autoloader will prompt you to enter your password now.

The autoloader will now override your device’s internal storage with the developer OS. When it’s finished, the command window will close itself and your device will reboot. It will now behave like after a factory reset, you will see the setup guide again.

Enjoy the JellyBean runtime

You are now able to use apps requiring the new API versions, you can sideload them like you are used to. The BB10 Sideloading Tool and the apps on our website are ready for the new runtime. Keep in mind that there still are a few limitations, as you can read up here.

How to sideload apps on BB10

This guide will teach you step-by-step how to install .BAR files on your BlackBerry 10 device or BlackBerry PlayBook. If you own a Mac, please follow this guide: Sideloading guide for Mac.

Preparations

Network

First of all your BlackBerry device and your PC need to be in the same network. Connect your BB10 device with you local Wi-Fi and join that network with your PC. You don’t need to connect your device via USB.
If you don’t have any network available, connect your device via USB and use 169.254.0.1 as IP address.

Development mode

To sideload applications your device needs to be in development mode. You can find this option in

Settings – Security – Development Mode

You will need to setup a password, make sure you don’t forget it. Once the development mode is active, find out your device’s IP address. Therefore go to

Settings – About – Network – IPv4

Install the BB10 Sideloading Tool

You can download it here. Execute and install it (you may need admin rights). The BB10 Sideloading Tool allows you to connect your PC with your device as well as sending and installing selected .BAR files.

Start sideloading

Connecting

Now start the BB10 Sideloading Tool. You will see a setup guide if you start it for the first time. Click continue until you see the settings screen and enter the IP address of your BlackBerry device and the password for the development mode. Click “Check connection” to see if your network is setup right.

Install .BARs

Now switch to the “Install” tab or restart the tool. Drag and drop your .Bar files into the package icon and click “Start sideloading”.

Let the tool do the work for you

The tool will now send and install each of your selected .BAR files. Don’t interrupt your network connection during this process. Once the tool finished, have a look at your device’s home screen. You will find your sideloaded apps there. If an app is missing, have a look into the log and find out why.

Video tutorial

You can follow this video to setup the BB10 Sideloading Tool for the first time.